
How to Avoid DNS Leaks with OpenVPN in Ubuntu
Manually adding your nameservers appears to avoid DNS leaks in Ubuntu when using OpenVPN.

By. Jacob
Edited: 2022-02-23 18:43
DNS leaks is a common problem when using OpenVPN from a terminal in Ubuntu to connect to a VPN, but it is fairly easy to solve once you know what causes it.
The problem: is probably often caused by conflicts between the various scripts and software that handles DNS on a system. For example, the desktop version of Ubuntu, Kubuntu, and Lubuntu. Etc. will be running NetworkManager and systemd-resolved as a service; what actually seem to happen is that NetworkManeger edits the /etc/resolv.conf file when the system starts, and inserts a nameserver address (a localhost IP) which the systemd-resolved service is listening on.
The systemd-resolved service seem to parse the pushed DCHP settings that it gets from the ISP/router on the LAN, which then seem to sometimes take priority or overwrite DCHP settings that are pushed by the VPN.
The solution is surprisingly simple for desktop users. Since you are using NetworkManager, you simply need to change a single setting within the NetworkManager app to stop all this bullshit from happening — but I will get to that later in the article.
Updating DNS automatically from DCHP
Some VPN providers have their own DNS servers, but in order for a client to know about them, it will have to obtain them from the VPN server. This is typically done by "pushing" a DNS via DCHP when a client connects to the VPN.
The problem with this is that it is entirely op to the software on the client whether it wants to use the pushed DNS. In the case of OpenVPN, we need to call a script to parse the pushed DNS and update the client DNS settings. Luckily, it seems a script called update-systemd-resolved already comes with OpenVPN to do this.
1. To use the script, edit the .ovpn file that you use to connect to your VPN, and then add the following to the end of the file:
script-security 2
up /etc/openvpn/update-systemd-resolved
up-restart
down /etc/openvpn/update-systemd-resolved
down-pre
dhcp-option DOMAIN-ROUTE .
Without this, your local settings will not be updated with the DNS provided by the VPN.
2. install openvpn-systemd-resolved:
sudo apt install openvpn-systemd-resolved
3. The tricky part is how to prevent that your ISP DNS servers are used; because of apparent conflicts between the software that handles DNS on Ubuntu, the easiest way to prevent DNS leaks is to simply not fetch DNS from your ISP, and instead type the servers manually. Alternatively I recommend either using Google or OpenDNS instead of your ISP's servers.
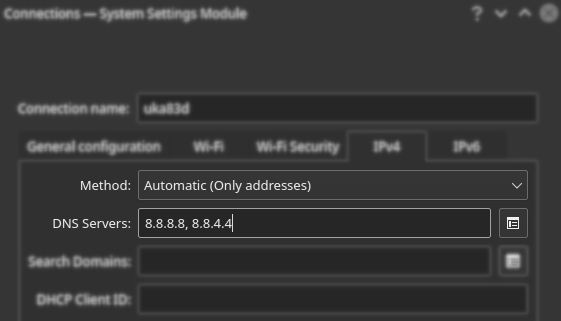
One way to stop fetching DNS from your ISP/router is to configure NetworkManager with the Only addresses option instead of leaving it on automatic, then your device should only be using the DNS servers that you specifically provide. This also appears to solve the problem with DNS leaks, as these addresses do not seem to overwrite those configured by update-systemd-resolved.
Note. It is important you keep in mind, even DNS queries will be passed through the VPN tunnel. The important thing is that you make sure the desired DNS servers are used. If you use your ISP's servers, then they will also be able to deduce what websites you are visiting, simply because you are connected to the VPN at the same moment the VPN is querying their DNS servers.
Screenshot:
OpenDNS's DNS Servers
nameserver 208.67.222.222
nameserver 208.67.220.220
Google's DNS servers
nameserver 8.8.8.8
nameserver 8.8.4.4
How DNS traffic is sent through VPN
The benefit from using a VPN rather than a proxy with a web browser is that you will be sending all of your internet traffic through the VPN. This means that when your client device is attempting to send a DNS query, it should also go through the VPN — in other words, the VPN will be performing those queries on your behalf.
This is not always the case, but it will be when things are properly configured. A less common configuration will allow you to devide your traffic, so that some of it goes through the VPN, while other traffic goes through your own IP. This is less common, both because it is harder to configure, and because it is typically not what users expect to happen.
DNS leaks
If your ISP's DNS server is somehow still used, then this server will be seeing the IP address of the VPN when receiving queries. The reason this is still bad is that it would be easy for your ISP to guess that the traffic is coming from you. Whether it matters or happens much in practice is another discussion — the point is, when you use a VPN, you typically also expect the VPN's DNS servers to be used.
DHCP settings
Like your ISP or router uses DCHP, a VPN might also "push" specific DNS servers to your device via DHCP; but it is entirely up to your operating system whether it knows how to apply those DNS servers correctly.
Some systems will contact the first DNS, and only move on to subsequently listed servers if the first fails, while other systems might try and contact all of the DNS servers and simply use the one that responds first. Perhaps even more stupid, some systems might even still use/add the ISP, DHCP, pushed name servers together with whatever is pushed by the VPN.
Most users want and expect that the DNS pushed by the VPN is used exclusively, but that is not always the case when things are just left on "automatic" configurations.
Remember DNS queries themselves should still go through your VPN — a DNS Leak usually just means that you are still querying your ISP's servers; even though the queries are being sent through the VPN, it is still a bad situation, because an ISP will more easily be able to deduce who is sending the queries.
resolv.conf
On some operating systems, there is a file called /etc/resolv.conf that contains the name-server IP addresses used for DNS resolving. This file can either be configured manually by the user or automatically by software.
If you already know the DNS server-IPs that you want to use, then you could just ignore DHCP entirely, and add them manually either in the NetworkManager GUI, or the /etc/systemd/resolved.conf file.
This is because editing the /etc/resolv.conf file directly is not safe, since it is often overwritten by other software. Instead, you can add the DNS in the /etc/systemd/resolved.conf file separated by space. I.e.:
[Resolve]
DNS: 8.8.8.8 8.8.4.4
Conclusion
The debugging process made me realize that the problem might not be with systemd-resolved specifically, but rather conflicts between different software that handles DHCP and DNS settings in Ubuntu.
I found using the Only addresses option in the NetworkManager GUI seem to avoid DNS leaks while using a VPN.
The problem appears to be caused by DHCP-pushed DNS servers getting applied at unwanted times, so the simplest solution might be to just avoid DHCP entirely and configure DNS manually.
Presumably, if you configure your LAN manually, with fixed local IP addresses, and manually entered DNS, then the problem should also go away. I have not actually attempted this myself since it is impractical when you are on the road as much as I am, but I am pretty sure it should work in many cases. Some routers even allow you to reserve LAN IPs to specific devices, which is a nice way to avoid conflicts with other devices on a LAN, but impractical when visiting your friend, since most people rely on DHCP. The Only addresses option is a nice compromise that brings you the best from both worlds; automatic configuration of LAN IPs via DHCP, and manual configuration of DNS servers.
Tell us what you think: