
How to Install Nextcloud on Your own Server
This tutorial explains how to install Nextcloud on the Apache HTTP server in Linux.

By. Jacob
Edited: 2018-10-14 10:28
A few months ago, I learned about Nextcloud, a really cool solution to host your own files in the cloud, or even on a local server.
Before Nextcloud, I would use a combination of DropBox and Google Drive to host my files. But, as you may know... Recently DropBox announced they would end support for some encrypted file systems in Linux. EXT4 with full disk encryption is still supported, but apparently not if only the home folder is encrypted.
Changes like this makes me mad, because it gives me unnecessary extra work. Plus. I kinda prefer my source-code and project files to be encrypted on my laptop in case it gets stolen.
Installing Nextcloud
Assuming you already have Apache, PHP and MySQL installed, getting Nextcloud running will be easy. Nextcloud does not require any extra specialized knowledge to work.
1. You need to make sure the required modules are installed. When you install PHP7.2, many of these modules already appear to be installed by default (or I had already installed them myself). Some are not however, and you will need to install those. You should check the official installation guide for an updated list of required modules. It does no harm to simply try sudo apt install php7.2-[module name] if in doubt if something is installed or not, (you might get a response telling you it is already installed).
The official manual lists the following required modules:
- PHP (>= 7.0, 7.1 or 7.2)
- PHP module ctype
- PHP module dom
- PHP module GD
- PHP module iconv
- PHP module JSON
- PHP module libxml (Linux package libxml2 must be >=2.7.0)
- PHP module mbstring
- PHP module openssl
- PHP module posix
- PHP module SimpleXML
- PHP module XMLReader
- PHP module XMLWriter
- PHP module zip
- PHP module zlib
Some of these seem to have different names when you need to install them via apt install. For instance, SimpleXML is found in php7.2-xml. I would not personally worry too much if a module is not found with apt install. Maybe it has another name, or maybe it has been deprecated.
There is a few ways to find/install modules:
- Check for the existence of a module with php -m | grep -i [module_name]
- You can search in Google to learn if a given module exists for your PHP version. I.e.: install GD PHP7.2 apache
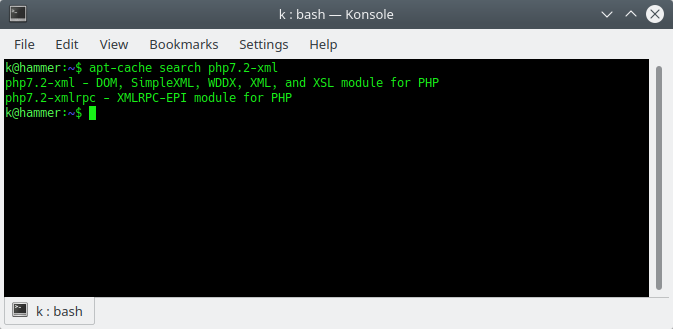
- You can also use apt-cache search PHP7.2- to search for the module to install. This should give you a result like in the screenshot below.
2. Navigate to /var/www/ and perform wget https://download.nextcloud.com/server/releases/nextcloud-14.0.3.zip
Note. If you wish to install in a subdirectory on an existing website (vhost), you should instead navigate to the appropriate directory. I.e.: /var/www/some_virtual_host_name
You can find the latest version of nextcloud on this link: https://nextcloud.com/install/. Simply right-click the download link and choose "Copy Link Location". You can paste this into a terminal by pressing [CTRL] + [SHIFT] + [V].
If this is on a local server, you can simply save the .zip file directly into your /var/www folder (assuming you user got permissions for that).
This should download the files for Nextcloud into your www directory. Now you just need to unzip the files. I used unzip for this. So, if you do not have that installed, first do:
sudo apt install unzip
Then extract the nextcloud-14.0.3.zip file you just downloaded:
unzip nextcloud-14.0.3.zip
This should create a directory, /var/www/nextcloud, you may rename this to something else if you feel like it.
(Optional) Renaming directory:
sudo mv nextcloud newName
3. You should now configure your Apache Virtual Host file (VHOST). How to do this depends on your particular setup.
VHOST If you are hosting several websites on your server (called VHOSTs), you will need to edit the .conf file for the website where you got nextcloud installed.
For a typical VHOST setup, the .conf files might be located in: /etc/apache2/sites-available (but this depends on your Linux distribution).
Add the following to the <directory> block in the .conf file:
<IfModule mod_dav.c>
  Dav off
</IfModule>
SetEnv HOME /var/www/YourSite/nextcloud
SetEnv HTTP_HOME /var/www/YourSite/nextcloud
Admittedly, I am not aware what these SetEnv (environment variables) are used for, since the official Manuel did not explain it properly. Presumably they are needed by Nextcloud PHP scripts. The official documentation also says to include an Alias, but I think this is only necessary if you install Nextcloud to some other location on your server.
For a VHOST SSL enabled site, the configuration should look like this:
<VirtualHost *:443>
DocumentRoot "/var/www/YourSiteName/"
ServerName YourSiteName.com
ErrorLog ${APACHE_LOG_DIR}/YourSiteName.com-error.log
CustomLog ${APACHE_LOG_DIR}/YourSiteName-access.log common
<Directory "/var/www/YourSiteName/">
  Options FollowSymLinks
  AllowOverride All

  Order allow,deny
  Allow from all

  AddDefaultCharset utf-8
  <IfModule mod_dav.c>
    Dav off
  </IfModule>
  SetEnv HOME /var/www/YourSiteName/nextcloud
  SetEnv HTTP_HOME /var/www/YourSiteName/nextcloud
</Directory>
Note. The VirtualHost IP part *:443. For non-SSL, simply use port 80 instead.
When done, remember to enable or reload your configuration file, and restart Apache.
sudo a2ensite YourSiteName
sudo service apache2 restart
If you have both HTTP and HTTPS on for your sites, remember to both edit the normal configuration, and the SSL variant. You will often be using the non-http version when working on a localhost installation. For example, I have a copy of my own websites running locally for development.
4. Finally, create a database for Nextcloud to use. To do this, simply login to MySQL from terminal, and enter the following:
CREATE DATABASE name_of_new_database CHARACTER SET utf8mb4 COLLATE utf8mb4_unicode_ci;
Note. It is now recommended to use utf8mb4 instead of utf8. It is a technical explanation that you have to read about somewhere else. Maybe Google it?
If you do not know how to log in, this is the command for logging in:
mysql -u[USERNAME] -p
After completing the above 4 steps, you should be able to run the setup from your browser by visiting yoursite.com/nextcloud/
Links
- Installation on Linux - nextcloud.com
Tell us what you think: