
How to Move a Wordpress Website Manually
How to manually move a Wordpress website to another domain name, and copy the database and the files from the old site.

By. Jacob
Edited: 2021-04-19 17:24
To move a wordpress website we can either choose to migrate it manually — which is still the easiest method when working with larger sites — or we can migrate it using a plugin like 1 Click WordPress Migration. If your site is too large to handle with a migration plugin, then you should just move it manually; this tutorial will walk you through the process of moving a Wordpress site manually.
Wordpress based websites are usually very easy to move manually, you will just need two things, a copy of the files, and a copy of the database.
Before you start the migration process, I recommend either placing your site in maintenance mode or blocking access temporarily — doing that should ensure that the website data is not modified doing the process.
1. You need to export (copy) the database on your old website.
Some hosting companies will allow you to manage your database through phpMyAdmin, which is a web-based GUI that you can use to download a backup of your database; but you can also login through SSH and make a backup using the command line utilities. While using the command line is probably out of the question for most people, both is actually easy to do once you know how, and the command line might even be easier due to one-line solutions and less restrictions.
2. You will also need to download the files from your website.
To download a copy of the website files, you can use a FTP program such as FileZilla or CyberDuck. But please note that simply copying the files alone is not going to be enough to migrate the website — as I mentioned earlier, you will also need a copy of the database!
The files should be copied to the web root of your new website — the web root is often /var/www/my-site-name/, but the exact location will depend on your host and whether you are using Windows or Linux based hosting.
3. You will need to import the database backup on your new website.
This can either be done from the command line, or from phpMyAdmin. Sometimes, if the database is very large — and by large I mean at least a few hundred megabytes in size — it may be easier to do it from the command line, since the maximum file-size of uploaded files is usually very low.
4. Finally, when moving a Wordpress site manually, you will also need to edit the configuration files and database options for the new site to work properly.
Inside the database there is a wp_options table with various configuration options you can change; you will need to change the siteurl and home options so they match the URL of your new site — again, this can be done easily from phpMyAdmin or the command line.
Note. A more detailed explanation, with screenshots, is provided in the following sections. The order that you complete these steps in are not particularly important. I will show both how to use the command line, as well as how to use phpMyAdmin.
Creating a database backup of a Wordpress website
As I mentioned in the introduction, you will need to create a backup of the database. Wordpress is using a database for most dynamic data; this include things like articles written on the site, users and passwords, custom post types, and even plugin configuration options.
The easiest way to create a backup of a MySQL database is by using the mysqldump tool from the command line. For example, this single one-liner can backup the entire database:
mysqldump -uUser_name -p database_name > /home/my_username/database_name.sql
Note. The -p option will prompt you for your MySQL password.
This would store a backup at the /home/my_username/ location. If you are using Windows, you could instead use a location like c:\database backups\ — just pick a location that you can easily remember and find when needed.
Now, since most people are afraid of the command line, I will also show how to do this using phpMyAdmin.
Your web host should have a link to phpMyAdmin from the control panel; some hosting companies also allow you to login via phpmyadmin.example.com — check the documentation provided by your host when in doubt.
Once you are logged in, you should immediately see a screen like the one in the screenshot; at this point you should just push the "Export" button:

From the next screen, choose the .sql format for your database export. Alternatively, if your database is more than a few hundred megabytes in size, you can try to store it in the .zip format, as this may give you some leverage when you need to load the backup later.
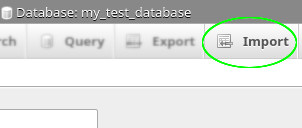
Importing a database backup
You might need to create a new database before you can import your database backup. Some hosting providers will only allow you to have one database per domain, and they might already have created the database for you — if this is the case, then you can just import your backup into this database.
Unfortunately, if you need to create a database, your hosting company might not always allow you to do so. This is where "prefixes" are useful on database tables. So, if you only have one database, simply import the backup into that one — just be careful that you do not already have a Wordpress site running on the database, or at least make sure the prefixes are different.
If you need to create a new UTF-8 database, you can either use the following one-liner from the command line (after logging in to MySQL):
CREATE DATABASE name_of_new_database CHARACTER SET utf8mb4 COLLATE utf8mb4_unicode_ci;
Then, to import the database:
mysql -uUser_name database_name < /home/my_username/database_name.sql
Or, you can create the database from phpmyadmin — unfortunately this might not be possible on all web hosts — some hosting companies might want you to create the database from the control panel; you should check with their documentation to find out how it is done on your hosting provider.
If your MySQL user has the necessary privileges to create databases, and if you prefer using phpMyAdmin, just follow the steps in the screenshot:

When importing the backup, just hit the import button in phpMyAdmin's interface:
When importing databases with phpMyAdmin, the maximum upload size may be limited by web server configuration; but, you can increase these limits if you got access to server configuration — how to do that will not be covered in this tutorial.
Copy the files from the old Website
Copying the files from the old Website can be done using a FTP program like FileZilla or CyberDuck. These should also allow you to connect to your server over SFTP, which is more secure than traditional FTP.
How to connect to your website will depend on who is your hosting provider; I recommend reading their documentation if you are in doubt.
If you are using AWS, then I already wrote an excellent tutorial on how to Connect to AWS EC2 instances with FileZilla, you can follow the instructions provided in that if needed.
Updating wp_options and wp_config.php
After importing your database backup, you should also update the siteurl and home options in the wp_options database table. Again, this can either be done from the command line, or you can fire up phpMyAdmin. From the command line this can be done with this one-liner, where http://local-test-site.beta should be replaced with your own value:
UPDATE wp_options SET option_value='http://local-test-site.beta' WHERE option_name = 'siteurl' OR option_name = 'home';
Note. The above command also works when executed from phpMyAdmin.
From phpMyAdmin you can just navigate to the wp_options table and update the relevant fields.
Finally you should also update the wp_config.php file. The easiest way to do this is to simply open the file in your favorite text editor, and then check which values that needs to be updated; typically you will need to change the following:
- Datanase username
- Datanase password
- Datanase host
- If using the WP Super Cache plugin or similar, you might need to change the path for the cache directory.
Finally, if you got stuff like the below lingering in your wp_config.php file, you can safely remove it; since we are moving the site and updating values manually, these should not be needed:
define('RELOCATE',true);
define('WP_SITEURL', 'http://local-test-site.beta');
define('WP_HOME', 'http://local-test-site.beta');
define('FORCE_SSL', false);
define('FORCE_SSL_ADMIN', false);
Common problems after moving
From time to time I have encountered various problems when moving a Wordpress site, some of these will be discussed in the following subsections.
When you have finished migrating the website and try to load the new website for the first time, it should be possible to login to the Wordpress administration using your old username and password. The default login URL is wp-admin/; for example, if your website was installed in the root folder, the absolute URL might look like this:
http://example.com/wp-admin/
I recommend you use a fresh incognito window while debugging, as it might help prevent client-sided caching issues.
Caching causes a lot of problems
Caching plugins are quite popular, but often adds little or no speed benefit, so you should carefully weight if these are worth using on your site before you decide to keep them. If this is a local development machine, then it might be best to disable them, since you might be modifying HTML, CSS, and JavaScript files all the time anyway.
If you are using caching plugins, then it is important to clear the cache after moving, as an outdated cache can result in broken layouts and images not loading properly. In some cases, problems with caching also seem to happen due to certain hosting providers offering their own caching plugins. I recommend you disable those entirely, and never rely on a web-host controlled Wordpress installation for your website — instead you should consider installing Wordpress yourself!
When static assets are cached by Wordpress plugins, they will typically be combined and minified; when a web-host is caching your stuff, they might also cache HTTP responses in order to save server resources — this is probably very tempting to do for a shared hosting provider, since each server might host hundreds of other sites, and they can save a lot of resources by doing it.
That is also why I personally prefer to use cloud hosting like AWS, Azure or Google, as they give customers full control over the server environment, and resources scale more easily to fit my needs.
Local website redirects to HTTPS
When creating a local "development" copy of a website, you do not really need to have HTTPS enabled, but sometimes the website might still redirect to the HTTPS version against your wishes. I have previously covered this problem in this article: Stop Wordpress From Redirecting to HTTPS
Problems with redirects can be fixed by disabling the SSL plugin, or updating the .htaccess file.
You should not have too many problems with SSL/TLS on a new domain name, since the certificates are installed on the server-level. If you manage your own server, then you might need to install a new certificate via your hosting providers control panel, or you can use Let's Encrypt, which is free, and should be equally secure.
Tell us what you think: