
Resizing a VirtualBox Guest VDI From a Linux Host
Resizing a VirtualBox guest Linux .vdi from a Linux host.

By. Jacob
Edited: 2021-10-31 09:42
Recently I had to resize one of my VirtualBox guest VDI's from a Linux host. As you may know, these are stored as .vdi files somewhere on your hard drive. I prefer keeping them in a single directory for easy backup and access.
Resizing a drive from Linux is super simple. I prefer storing all my VM files in a single directory, so I will first navigate to this directory, then use a command to resize the .vdi itself. After this, I simply use GParted from a Live Session running on the guest machine to resize the VM partition.
The following steps assumes you understand how to use Linux already, but you can also read the next section for a detailed version.
Note. You may want to create a backup of your .vdi before you continue.
Short Step By Step:
- Terminal command: VBoxManage modifyhd "my-vm-file.vdi" --resize 50000
- Boot Virtual Machine into Live Session from Ubuntu's installation .iso
- Run GParted from a terminal I.e.: sudo -i gparted
- Resize your main partition using GParted.
- Remove the Ubuntu installation media, and reboot
Your disk should now have the new size. Enjoy!
Resizing a Linux guest VDI disk and partition
1. Start by navigating to the location of your VM .vdi file, then type the following command:
VBoxManage modifyhd "my-vm-file.vdi" --resize 50000
The number 50000 is the size in megabytes you want available in the virtual machine. Typically, it will be dynamically used on your physical disk as the virtual disk is filled out. But, you still best not make this larger than what you expect to have physically available.
I used to create a virtual disk of about 20 Gigabytes, but it turns out this is way too low for my use. If you have the space, then there is no reason not to make your virtual disks larger from the start, which will avoid having to resize it down the road.
Tip. If you do not like using the terminal, you can use Nemo file manager, to navigate to the directory where you store your .vdi file, right click, and choose "open in terminal".
Alternatively, you may simply specify the path directly:
VBoxManage modifyhd "/home/user/VMs/my-vm-file.vdi" --resize 50000
2. Download a Ubuntu installation .iso. You will use this to boot up your Virtual Machine into a Live Session from the .iso.
Tip. You can find the latest LTS of Ubuntu in the download section on their website.
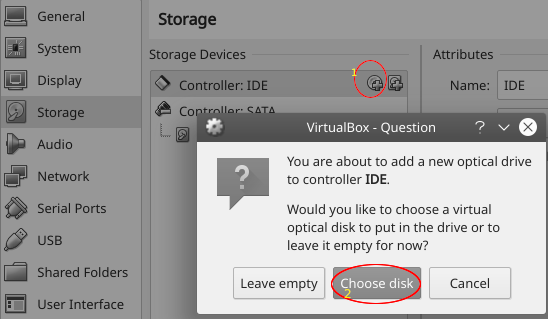
3. Load the .iso as a optical drive from the VirtualBox settings. I.e.:
4. Once booted into the Live Session, open a terminal and type the following:
gparted
If this does not work, you may need to run gparted using sudo. I.e.:
sudo -i gparted
5. Using Gparted, you will need to resize your main partition. Depending on how the disk is partitioned, this may not be possible right away.
The swap partition has a tendency to get in the way of resizing, so you will need to first right-click on the swap partition, delete it, and then resize your main partition. Be sure to leave enough space for re-creating your swap partition afterwards. Do not worry, the swap partition can safely be removed and re-created, since it is only used for swapping (a type of extended memory used if running out of RAM)
To re-size your main partition, simply right-click on it and choose resize/move from the menu. Similarly, you may choose delete from the menu when right-clicking on the swap partition.
6. Remove the Ubuntu installation media, and reboot. Your disk should now have been resized.
Links
- Ubuntu downloads - ubuntu.com
Tell us what you think: