How to Remove Backgrounds in Gimp
Removing a background in The Gimp image editor can be difficult. Before you can delete a background, you will first need to add alpha transparency to the layer.

Edited: 2018-01-27 11:31
Gimp is a truly amazing program, obviously i say this mostly because it is free, but also because I think Adobe Photoshop, and other Adobe programs are overpriced. However, Gimp can be difficult to work with, until you learn how to do things the Gimp-way.
For example, If you open a .jpg image that you downloaded from the internet, and then try to cut out an object, making the background transparrent, then you will find nothing happens when hitting delete. This is very non-intuitive and inconvenient. But there is a solution.
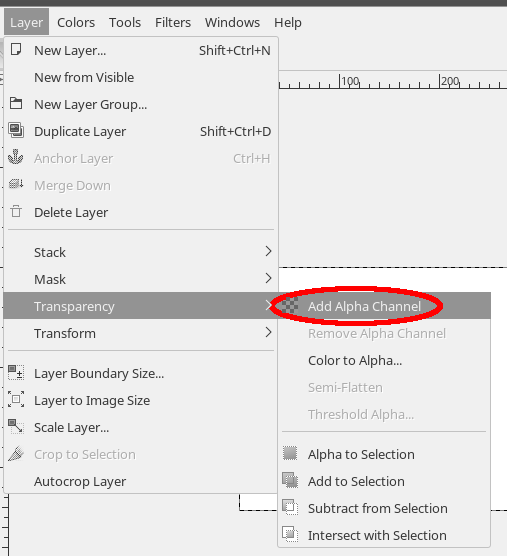
First, add an alpha channel to the layer, before deleting the selected part of the image. I.e: Layer → Transparency → Add Alpha Channel
There is a video included last in the article, showing two ways to add the an alpha channel.
Making a layer transparent in Gimp
To make the layer with the image transparrent, you will need first need to add alpha transparency to the image. How to do this is shown in the screenshot below:

Simply choose: Layer → Transparency → Add Alpha Channel
Then you should finally be able to perform a selection and hit delete, just as you would in other graphics editors. You can also start erasing the background with the eraser tool.
Removing a background
Removing a background is done the same way in most editors. In Gimp it is done a little differently than in Paint.Net, because you first need to add a alpha channel (unless it already exists). However, after adding the alpha channel to the layer, you should easily be able to delete the background.

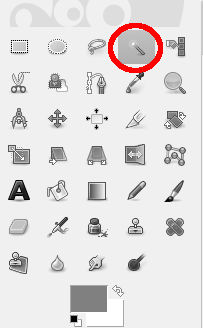
Find one of the shape selection tools, or the magic wand in the tool box. Then make a selection in the layer, and hit [delete] on your keyboard.

Tell us what you think: