How to Take Screenshots in Windows
To take a screenshot, either hit the Print Screen button on your keyboard, or use the build-in Snipping Tool found in Windows 10.

Edited: 2022-01-17 09:08

Taking a screenshot can be useful under many different circumstances, however, few seem to have mastered this wonderful feature in their operating system. But, taking a screenshot is actually done in similar ways in most operating systems. In Windows, you can either take advantage of the build-in tool for the job, or you can do it the old fashioned way – by hitting a shortcut key on your keyboard.
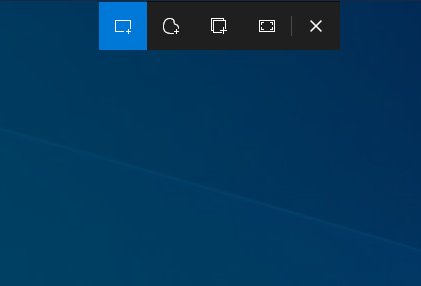
In Windows we use the Snip & Sketch tool; simply press ⊞ Win + Shift + S on your keyboard; this will slightly darken your screen, and display some snipping tools at the top of the screen:

Press the small rectangle to select the area of your screen you want in your screenshot.
Tip: Traditionally, after having taken a screenshot, you would first paste it into a program such as Paint.NET, Gimp or Photoshop, only to save them to a file, and finally share the screenshot with a friend over Messenger. Now, this is no longer necessary, since you can simply paste the screenshot directly into the chat window, and whatever app you are using should automatically handle it for you – this also works on Facebook Messenger!
In Windows 11 taking a screenshot can be done in a couple of ways. The traditional method is to simply hit Print Screen (Aka. Prt Sc or PrtScn) on the keyboard. However, if you want to select an area of the screen, you should instead use the build-in screenshot tool, also known as the Snip & Sketch, or if you are on an older version of Windows 10, the Snipping Tool.
Note. The Snipping Tool has been replaced by the Snip & Sketch tool, which blends in more nicely with the desktop.
Using the snipping tool in Windows 10
In Windows 10, you may open the Snipping Tool by clicking on the Windows Logo in the bottom left corner of the screen (Aka. The Start Button). Simply start typing "Snipping Tool", and you should see the program among the suggestions. The tool looks like this:

To take a new screenshot, click on the "New" button, and simply choose the area of the screen you want to save.
The screenshot, almost regardless of how you take it, will be stored in the clipboard for later use. You can either paste it directly into programs or chat windows, or you can paste it into a graphical editor where you can edit the shot before saving.
Non-standard tablets and laptops
To great annoyance for the users, some laptop manufactures like to mess with default shortcut keys, so when hitting Print Screen nothing happens – or even worse – something else happens.
On some of these laptops, the shortcut for taking screenshots has been changed. You can try the following key combinations:
- ⊞ Win + Ctrl + Print Screen
- ⊞ Win + Fn + Print Screen
On tablets, taking a screenshot may be equally inconvenient. Try the following:
- Windows logo button + volume down
Hopefully this tutorial will teach manufactures not to mess with default shortcut keys in Windows. Also this: If it ain't broke, don't fix it.
If none of the above worked for you, try reading the manual that came with your device (apparently you need to read it).
Links
- Open Snipping Tool and take a screenshot – support.microsoft.com
- Get Snip & Sketch in Windows store - microsoft.com

Tell us what you think: